So...long time no post, eh? To be honest, I haven't been experimenting in the kitchen all that much lately. Instead, I've been making a lot of oldies-but-goodies while Dawson and I have been busy home-ifying our house! I'm so impressed with our work so far! Check out a few of our projects:
DIY Faux-Canvas Prints
Step-by-Step
Materials:
Poster sized photo
MDF
Paint
Spray adhesive
Picture hanging hardware
1) Get your photo printed and enlarged on some good quality paper. These are 20 x 30 but choose any size you like (we got ours done at Walmart thanks to a generous housewarming gift from some friends - thanks guys!).
2) Go over to Home Depot and get a piece of MDF cut to the same size as your photos - if you're friendly they'll do the cutting and measuring for you!
3) Attach your picture hanging hardware to the back of your MDF - usually the kit comes with some little nails to do this.
4) Now, flip the board over and paint the edges of your MDF and let it dry - these will show when it's up on the wall. We painted ours to match the wall, but you can use any color you like.
5) Spray the entire board with spray adhesive, concentrating on the edges.
6) Quickly, but carefully lay the picture on top of the board while being sure to line up the edges.
7) Squeeze out any bubbles and let the adhesive dry for about an hour.
8) Trim any part of the photo that overhangs the edge of the wood with an exacto knife and, voila!
Dawson's DIY Workbench
If you're interested, plans for this can be found here. Every man needs his workspace! Isn't this great?! It's solid as a rock (and weighs about 1000 lbs) and was way cheaper than buying a crappy plastic one from Canadian Tire. Plus, now he'll have space to work on all the other projects I have planned for him, starting with...
DIY Wooden Nail Polish Rack
Laugh if you want, but this was totally necessary. I used to have a spice rack with all of my polishes on it but I very quickly outgrew it and ended up wth polished randomly stashed all over the place. This is the perfect solution. It has room for my collection to grow, lets me keep them organized and even has little "anti-polish-suicide" barriers in the front to keep the bottles from taking a flying leap off of the ledge. You know you want one! Here's how we built it:
Materials:
3 pieces of 1x2x8 construction lumber - cut this into 8 24-inch pieces and 2 31.5-inch pieces
16 feet of molding (any kind you like, I "liked" the cheapest one I could find) - cut this into 7 26-inch pieces
Sandpaper
Wood Glue
32 small finishing nails, 1.5 inches long
14 headless nails, 1 inch long
paint (see note below)
Mounting hardware
Start by cutting all of your wood. Next, sand down all the edges to make them smooth and pretty, then attach the 1x2 pieces together like this:
 It's easier if you nail all of the shelves onto one of the sides first and then attach the other side. Make sure your shelves are level before nailing them in!
Now for the delicate part - attaching your molding. First spread some wood glue on the shelf where you want to mount your self.

Stick the molding on and while holding it steady, secure it with a headless nail on each end. Be very careful - the wood splits easily!
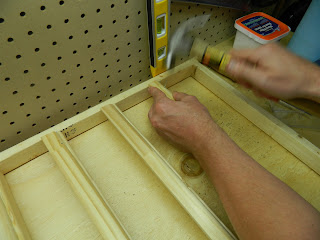
Now you get to do a dance with your almost completed rack!

Let your wood glue dry over night then paint with the color of choice. Get some mounting hardware and stick this baby up on the wall! Tada!!! Amazing polish shelf! You'll want you hardware to hold a significant amount of weight...like 75 pounds. Nail polish is heavy!
** Note: I painted this thing with left over semi-gloss latex paint. It worked but was kind of a pain. If you're going to make one of these I recommend you spray paint that baby. Either way works though!
In any case, I'm sure we'll be back to cooking soon enough! Until then I hope you try out some DIY home-ifying!
Continue Reading...
DIY Faux-Canvas Prints
 |
| Next step - a taller, upholstered headboard and refishing that old bedside table! |
Step-by-Step
Materials:
Poster sized photo
MDF
Paint
Spray adhesive
Picture hanging hardware
1) Get your photo printed and enlarged on some good quality paper. These are 20 x 30 but choose any size you like (we got ours done at Walmart thanks to a generous housewarming gift from some friends - thanks guys!).
2) Go over to Home Depot and get a piece of MDF cut to the same size as your photos - if you're friendly they'll do the cutting and measuring for you!
3) Attach your picture hanging hardware to the back of your MDF - usually the kit comes with some little nails to do this.
4) Now, flip the board over and paint the edges of your MDF and let it dry - these will show when it's up on the wall. We painted ours to match the wall, but you can use any color you like.
5) Spray the entire board with spray adhesive, concentrating on the edges.
6) Quickly, but carefully lay the picture on top of the board while being sure to line up the edges.
7) Squeeze out any bubbles and let the adhesive dry for about an hour.
8) Trim any part of the photo that overhangs the edge of the wood with an exacto knife and, voila!
Dawson's DIY Workbench
 |
| It's huge...6 feet long! |
DIY Wooden Nail Polish Rack
Laugh if you want, but this was totally necessary. I used to have a spice rack with all of my polishes on it but I very quickly outgrew it and ended up wth polished randomly stashed all over the place. This is the perfect solution. It has room for my collection to grow, lets me keep them organized and even has little "anti-polish-suicide" barriers in the front to keep the bottles from taking a flying leap off of the ledge. You know you want one! Here's how we built it:
Materials:
3 pieces of 1x2x8 construction lumber - cut this into 8 24-inch pieces and 2 31.5-inch pieces
16 feet of molding (any kind you like, I "liked" the cheapest one I could find) - cut this into 7 26-inch pieces
Sandpaper
Wood Glue
32 small finishing nails, 1.5 inches long
14 headless nails, 1 inch long
paint (see note below)
Mounting hardware
Start by cutting all of your wood. Next, sand down all the edges to make them smooth and pretty, then attach the 1x2 pieces together like this:

Now for the delicate part - attaching your molding. First spread some wood glue on the shelf where you want to mount your self.

Stick the molding on and while holding it steady, secure it with a headless nail on each end. Be very careful - the wood splits easily!

Now you get to do a dance with your almost completed rack!

Let your wood glue dry over night then paint with the color of choice. Get some mounting hardware and stick this baby up on the wall! Tada!!! Amazing polish shelf! You'll want you hardware to hold a significant amount of weight...like 75 pounds. Nail polish is heavy!
 |
| I swear the shelf is level, I just suck at taking pictures... |
** Note: I painted this thing with left over semi-gloss latex paint. It worked but was kind of a pain. If you're going to make one of these I recommend you spray paint that baby. Either way works though!
In any case, I'm sure we'll be back to cooking soon enough! Until then I hope you try out some DIY home-ifying!


